
Skill Level: Basic
Tools & Supplies to Make It:
- MySawgrass+ Membership
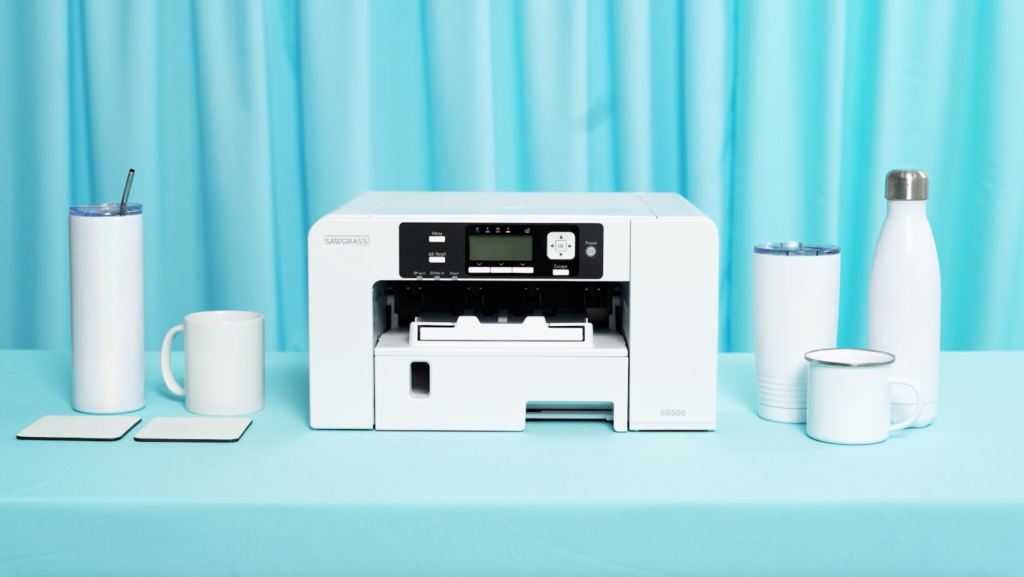
- Sawgrass SG500 or SG1000 Printer
- 15”x15” or larger Flat Press
- 11”x17” or larger sublimation paper
- Polyester T-shirt
- Lint Roller
- Heat Tape
- Blowout Paper
How to Create It:
- Log into MySawgrass and from the Landing Page choose Design.
- For your product, select the Relaxed Solar Short Sleeve T-Shirt. It can be found under Clothing.
- This project does not start with a Design, but will be built from elements and text.
- On the Create Your Design Panel, click on Elements and then Graphics Library.
- Go to the filter and click on People and hit apply.
- You can click on any of the women images to use them and make the design your own. The woman with the sign should be in the middle.
- You will need to resize and arrange the Images by using the move and resize icons on each image.
- You can start by using the mouse to lasso around all the images. This will select them and make it so you can resize the images together.
- On the Create Your Design Panel, click on Elements and then Graphics Library.
- Search for Female and then choose the female symbol with flowers.
- You will need to resize, move, and rotate the image by using the move, rotate, and resize icons on each image.
- On the left menu, click on Fonts.
- Type the letters BET in the left text box and choose the font Super Comic. Make sure to hit Done to apply the changes.
- With the move and resize icons, size and place the new text to the top left of the line of women.
- On the left text panel, click on Fill Color. We used Hex Code #494084. Make sure to hit Done to apply the changes.
- Type the letters TER in the left text box and choose the font Super Comic. Make sure to hit Done to apply the changes.
- With the move and resize icons, size and place the new text to the top right of the line of women. It will be after the sign.
- On the left text panel, click on Fill Color. We used Hex Code #494084. Make sure to hit Done to apply the changes.
- Type the word TOGETHER in the left text box and choose the font Super Comic. Make sure to hit Done to apply the changes.
- With the move and resize icons, size and place the new text below the line of women.
- On the left text panel, click on Fill Color. We used Hex Code #494084. Make sure to hit Done to apply the changes.
- When your design is finished, hit the Continue button to move to the product details page.
- You’ll be prompted to name your design, put it in a Category folder, and then hit save.
- On the Product Detail page, you’ll give the project a name and add a description, then hit print.
How to Print It:
- You should get a popup that asks if you want to open Sawgrass Print Utility. You will need to click Open Sawgrass Print Utility. If you are not seeing this, you’ll need to disable your popup blocker.
- In the Sawgrass Print Utility, start by scrolling down and making sure your print orientation is set to Landscape.
- For this project, you can use the preset Polyester T-Shirts.
- Make sure that the media size and type match what you have in the printer. T-shirts are set up for tabloid, but if you want a smaller design, set your paper size and then go to design files and click Fit to Paper Size.
- On the Color Management Tab, we suggest having the Color Mode set to Vibrant.
- When you’ve confirmed all of your settings, Hit Print.
How to Press It:
- Turn your press on and set the temperature to 385 degrees and the time to 45 seconds. Pressure should be medium.
- Prepare your t-shirt by using a lint roller to remove any fibers or dust.
- Place your design face down on the t-shirt and tape it down.
- Place the t-shirt on the lower platen of the press with the printed page on top.
- Place a piece of blowout paper on top.
- Close the press and wait 45 seconds before opening the press and removed the shirt.
Tips & Tricks:
- Getting lines on your fabric items? Ripping the edges of paper helps prevent those hard lines.
- Place blowout paper in the shirt to prevent any ink from accidentally getting on the back of the shirt.
- Customize this image further by changing the colors of the clothes on the ladies. When you select any element, you’ll see the colors used. Just click on them and alter.
Skill Level: Intermediate
Tools & Supplies to Make It:
- MySawgrass+ Membership
- Sawgrass SG500 or SG1000 Printer
- Convection Oven
- Shrink Wrap
- 8.5”x11” or larger sublimation paper
- Frosted Glass Bottle with Bamboo Lid and Straw
- Denatured Alcohol and a lint free cloth
- Heat Tape
How to Create It:
- Log into MySawgrass and from the Landing Page choose Design.
- For your product, select the 18oz Frosted Glass Bottle with Bamboo Lid and Straw. It can be found under Drinkware.
- On the Create Your Design Panel, click on Designs. Click on the filter icon and then select Inspiration and click apply.
- Choose the Cup of Ambition design.
- The design should come in at the correct size. If you wanted to make the image smaller, use your mouse and lasso around the elements to group them.
- Use the resize and move icons on the image to perfect the size and placement.
- When your design is finished, hit the Save & Print button to move to the product details page.
- You’ll be prompted to name your design, put it in a Category folder, and then hit save.
- On the Product Detail page, you’ll give the project a name and add a description, then hit print.
How to Print It:
- You should get a popup that asks if you want to open Sawgrass Print Utility. You will need to click Open Sawgrass Print Utility. If you are not seeing this, you’ll need to disable your popup blocker.
- In the Sawgrass Print Utility, start by scrolling down and making sure your print orientation is set to Landscape.
- For this project, you can use the preset Frosted Glass.
- Make sure that the media size and type match what you have in the printer. On the Color Management Tab, we suggest having the Color Mode set to Vibrant.
- When you’ve confirmed all of your settings, Hit Print.
How to Press It:
- Turn your press on and set the temperature to 385F degrees and the time to 480 seconds.
- Prepare your tumbler by using denatured alcohol on a lint free cloth to remove any dust or fibers.
- Wrap your design around the cup and tape it tightly in place with heat resistant tape.
- Place the cup in a shrink wrap bag and use a heat gun to create pressure.
- Place your item in the oven.
- Close the door and wait 480 seconds before opening the oven and removing the mug.
Tips & Tricks:
- For items in the convention oven, remove the shrink wrap and paper as soon as possible. This makes it easier to remove and less likely to stick.
- This can also be done in a tumbler press. This would be 120 seconds at 385F.
- Glass bottles and mugs are the only time you’d mirror on glass.
Skill Level: Basic
Tools & Supplies to Make It:
- MySawgrass+ Membership
- Sawgrass SG500 or SG1000 Printer
- 15”x15” or larger Flat Press
- 11”x17” or larger sublimation paper
- Waffle Weave Tea Towel
- Lint Roller
- Heat Tape
- Blowout Paper
How to Create It:
- For your product, select the Small Waffle Tea Towel. It can be found under Kitchen and Dining.
- On the Create Your Design Panel, click on Designs. Click on the filter icon and then select Monograms and click apply.
- Choose the Monogram Jar design.
- The design should come in at the correct size. If you wanted to make the image smaller, use your mouse and lasso around the elements to group them.
- Click on the Monogram Letter and change it to what you need in the text box on the left panel.
- When your design is finished, hit the Continue button to move to the product details page.
- You’ll be prompted to name your design, put it in a Category folder, and then hit save.
- On the Product Detail page, you’ll give the project a name and add a description, then hit print.
How to Print It:
- You should get a popup that asks if you want to open Sawgrass Print Utility. You will need to click Open Sawgrass Print Utility. If you are not seeing this, you’ll need to disable your popup blocker.
- In the Sawgrass Print Utility, start by scrolling down and making sure your print orientation is set to Portrait.
- For this project, you can use the preset Polyester T-Shirts.
- Make sure that the media size and type match what you have in the printer. T-shirts are set up for tabloid, but if you want a smaller design, set your paper size and then go to design files and click Fit to Paper Size.
- On the Color Management Tab, we suggest having the Color Mode set to Vibrant.
- When you’ve confirmed all of your settings, Hit Print.
How to Press It:
- Turn your press on and set the temperature to 385 degrees and the time to 45 seconds. Pressure should be medium.
- Prepare your tea towel by using a lint roller to remove any fibers or dust.
- Place your design face down on the tea towel and tape it down.
- Place the towel on the lower platen of the press with the printed page on top.
- Place a piece of blowout paper on top.
- Close the press and wait 45 seconds before opening the press and removed the tea towel.
Tips & Tricks:
- Getting lines on your fabric items? Ripping the edges of paper helps prevent those hard lines.
- Typically, you only press onto one panel of a tea towel since it gets folded and hung over a bar. The design is generally on the bottom middle panel.
Skill Level: Basic
Tools & Supplies to Make It:
- MySawgrass+ Membership
- Sawgrass SG500 or SG1000 Printer
- 12”x12” or larger Flat Press
- 8.5” x 11” or larger sublimation paper
- Hanging Heart Sign with Metal Insert
- Denatured alcohol and a lint free cloth
- Heat Tape
- Blowout Paper
How to Create It:
- Log into MySawgrass and from the Landing Page choose Design.
- On the Blank Product Selection Page, choose Open Custom Canvas.
- At the bottom of this page, click on the heart template to download it.
- Back in DesignMate, click on Upload Custom Canvas.
- Navigate to your Downloads folder and locate the template. Click open to add it.
- In the bleed area, add a bleed of .125”.
- Click Design Your Canvas to get started.
- On the Create Your Design Panel, click on Designs. Click on the filter icon and then select Valentines and click apply.
- Choose the Have My Heart design.
- To reduce or enlarge the image size, use your mouse to lasso around the images and select them all as a group. Then, use the resize icon on the group to reduce the size. It should stay centered.
- You can use the top, bottom, or side anchor points to slightly stretch the design and make it fit better in the area.
- When your design is finished, hit the Save & Print button to move to the product details page.
- You’ll be prompted to name your design, put it in a Category folder, and then hit save.
- On the Product Detail page, you’ll give the project a name and add a description, then hit print.
How to Print It:
- In the Sawgrass Print Utility, start by scrolling down and making sure your print orientation is set to Portrait.
- For this project, you can use the preset Metal Sign/Plaque.
- Make sure that the media size and type match what you have in the printer.
- On the Color Management Tab, we suggest having the Color Mode set to Vibrant.
- When you’ve confirmed all of your settings, Hit Print.
How to Press It:
- Turn your press on and set the temperature to 400 degrees and the time to 60 seconds. Pressure should be medium.
- Prepare your metal heart insert by using denatured alcohol on a lint free cloth to remove any fibers or dust.
- Place your design face down on the heart and tape it down.
- Place the metal insert on the lower platen of the press with the printed page on top.
- Place a piece of blowout paper on top.
- Close the press and wait 60 seconds before opening the press and removed the printed metal heart insert.
Tips & Tricks:
- Always check your blanks for a plastic film. This blank often has one, and it should be removed before pressing. It helps keep the surface clean and eliminates the need to wipe it with alcohol.
- The metal insert can be attached to the heart sign with double sided tape or a heavy duty glue.
The Tools:
- MySawgrass+
- Sawgrass Print Utility
- SG500 or SG1000 printer
- Blank substrates
- Sublimation paper
- Blowout paper
- Scissors
- Heat Resistant Tape
- Heat Press (additional resources may be required based on the project)
The Last Minute Gift Ideas:
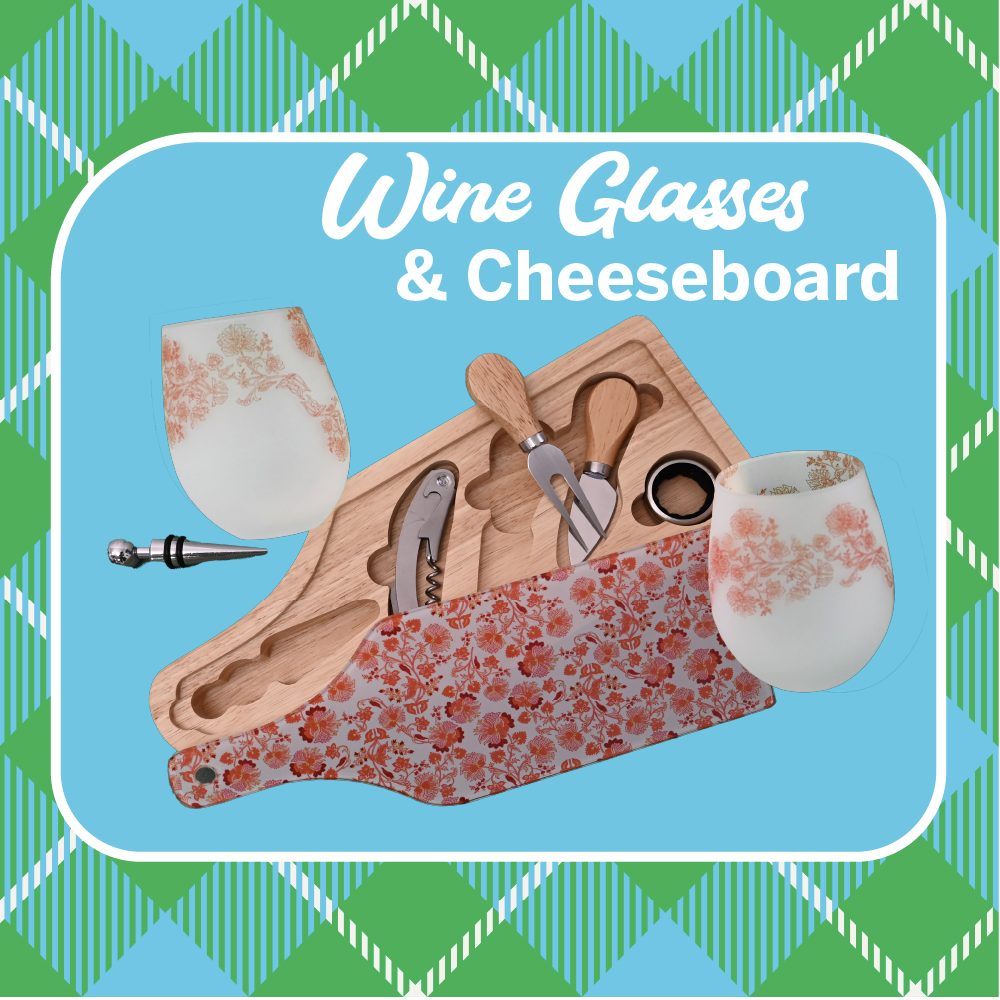
Transform ordinary wine glasses and a cheese board into a personalized gift set. Print a festive design, add a name, photo or special message, and voila – a perfect hostess gift! These frosted cheese and wine sets are always an instant hit. Check them out here!
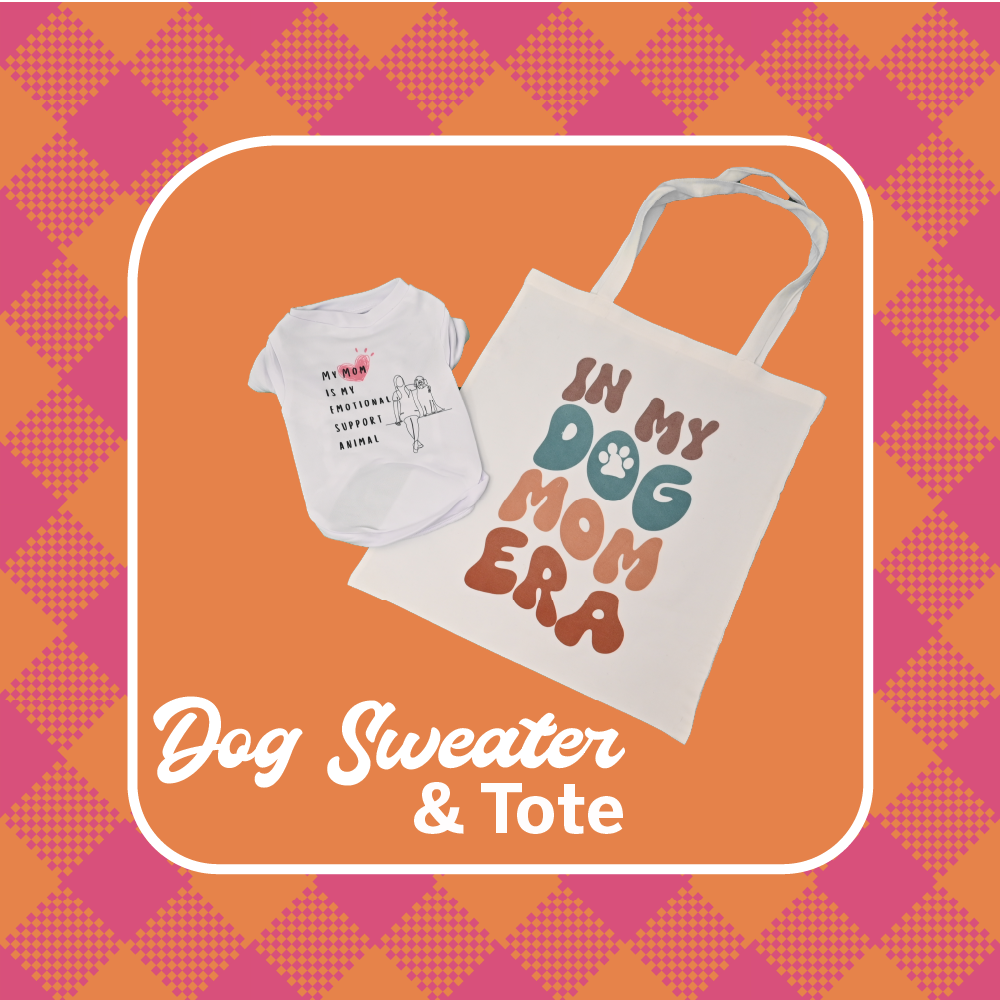
For your bestie with a fur-baby, create a matching set with a customized dog shirt and a stylish dog mom tote. You can find this pawsitively adorable design in MySawgrass+! Find Dog shirts here and Canvas Totes here!
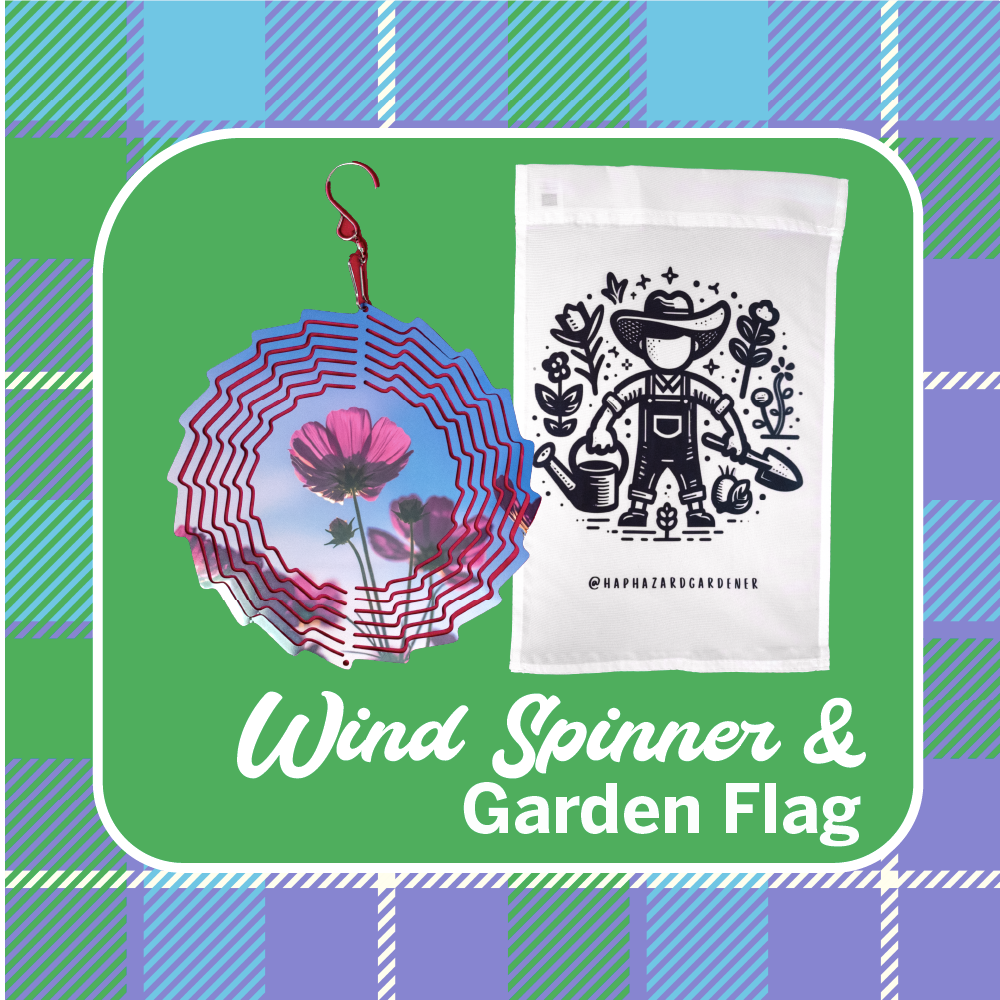
Got a friend with a green thumb? Spruce up their outdoor spaces with personalized garden flags and wind spinners. Whether it’s a holiday theme or a lovely quote, your creativity can brighten up any garden. Garden Flag | Wind Spinner
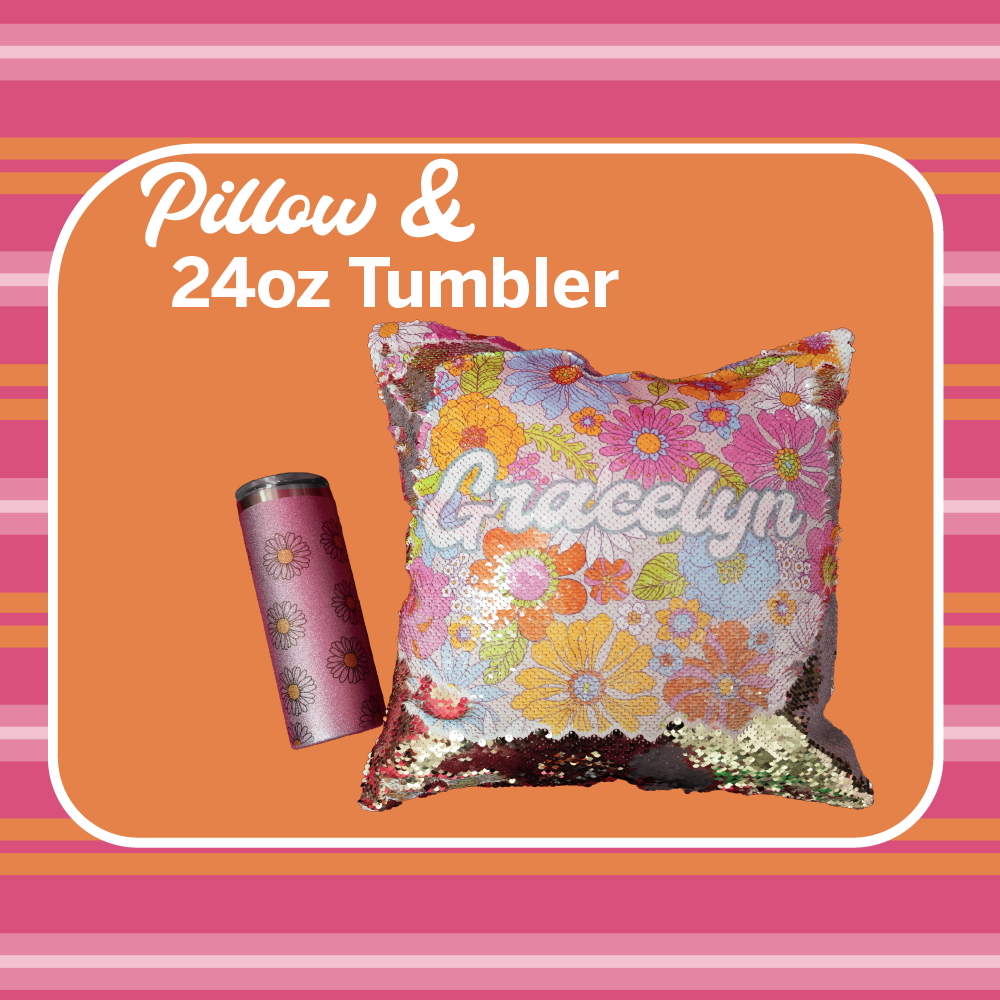
Got a glitter lover who can’t get enough? May as well add on and let the holiday spirit shine! Personalized sequin pillows are a perfect addition to any glitzy glamazon in your life. And of course, they need to stay hydrated in style! Glitter Sequin Pillows

Customize a workout ensemble with a sublimated work out top, hat, and socks. The perfect gift for fitness enthusiasts who appreciate a personalized touch to their gear. Socks
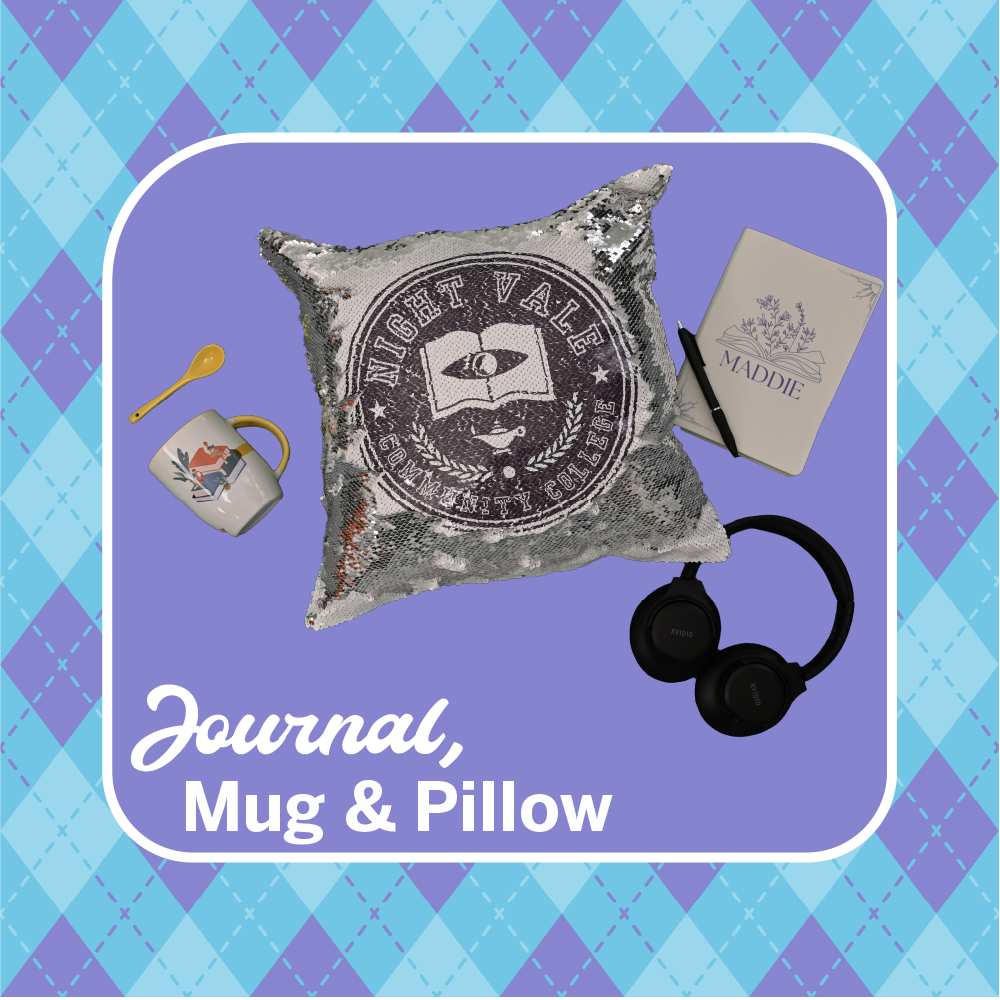
Elevate the classic mug gift with a twist! Sublimate a mug, design a matching pillow, and create a personalized journal for moments of mindfulness. A thoughtful and quick gift set. Mug | Pillow | Notebook
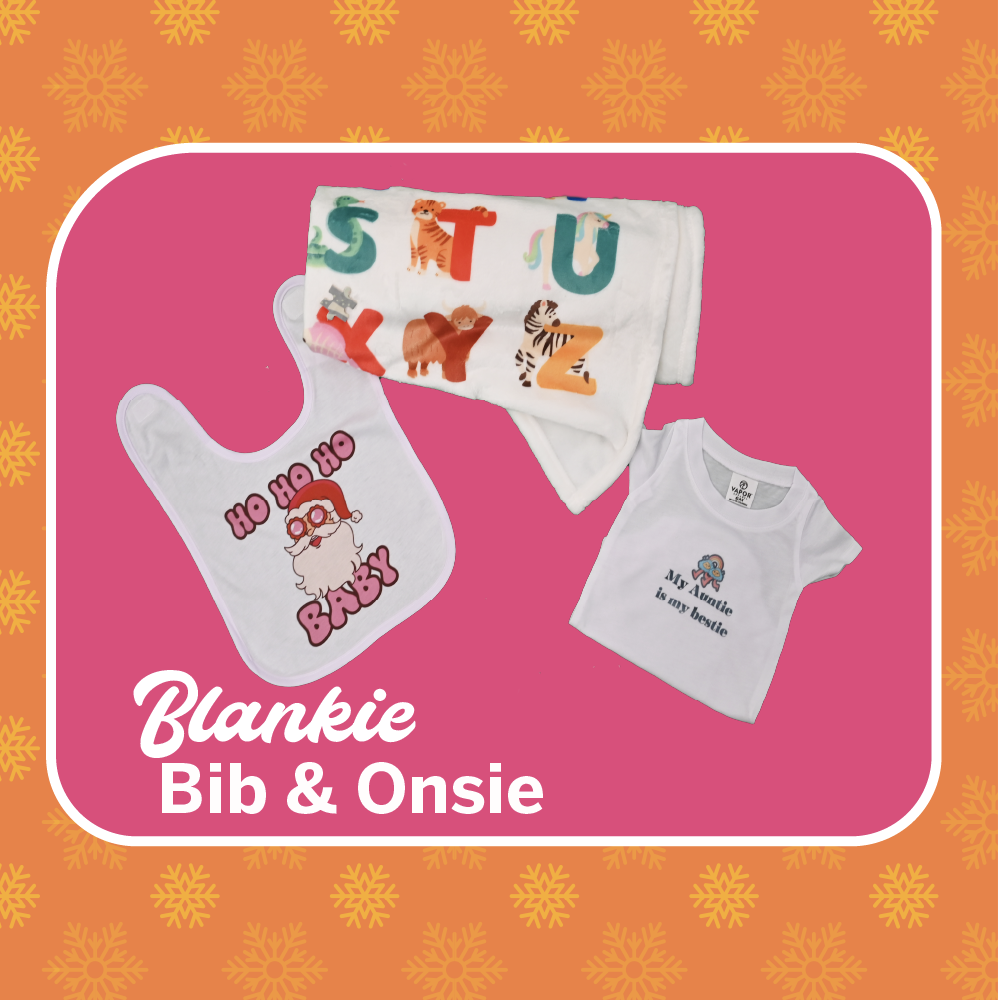
Craft a cozy baby blanket, customize a bib, and turn a simple onesie into a cute ensemble. Ideal for those heart-melting baby moments and perfect for baby showers. Bib | Onesie | Blanket
Don’t forget to share your creations on social media and inspire others with your last-minute sublimation wonders!
We are always striving to improve the MySawgrass platform to help our customers get printing faster and successfully every time. We deployed a new release of the design tool that adds one feature with two very important functions.
Print Button in the MySawgrass design tool
We have added a Print Button into the MySawgrass design tool. Previously, to print, you would hit “save and print” which would take you to the Product Detail page. You will still be saving on this page as well as setting up products for your MySawgrass store. If you ware looking to print, you can do that right in the design tool now with cuts out additional steps.
How to use the Print Button
When your design is ready, just hit print. On the pop-up, you’ll choose print and the file will be sent to the Sawgrass Print Utility. You will not have to save the file before it is sent to the Sawgrass Print Utility, but you will still have a pop up window you must acknowledge to send your file to the Sawgrass Print Utility.
Downloading a Proof
There is a second function under the Print button in the MySawgrass design tool. Once you click on the print button, you can choose between printing your product or creating a proof. When you choose the proof option, a PDF will go to your downloads folder. It will feature your artwork, and have spaces for you to add information about the project. This is a great way to share your artwork with clients for approval. You can also save a digital copy of your projects for your records. You could print the proof forms for this purpose as well.
Skill Level: Intermediate
Tools & Supplies to Make It:
- MySawgrass+ Membership
- Sawgrass SG500 or SG1000 Printer
- 12”x12” or larger Flat Press
- 8.5”x11” or larger sublimation paper
- Canvas Pillowcase
- Lint Roller
- Heat Tape
- Blowout Paper
How to Create It:
- Log into MySawgrass and from the Landing Page choose Design.
- For your product, select the 15.75” Linen Pillow Case. It can be found under Home Decor.
- For this project, we added our own artwork we created. To do this, click on Upload File and then hit Upload Image.
- Once you have chosen your image, You’ll need to put it in a Category and hit Submit.
- Use the move and resize icons to get your image where you want it to be.
- You’ll see the dimensions across the top. Resize the image until the dimensions fit on the size of paper you have available.
- You can use the Graphic Library and Font features to add Holiday images and sayings to your design.
- When your design is finished, hit the Continue button to move to the product details page.
- You’ll be prompted to name your design, put it in a Category folder, and then hit save.
- On the Product Detail page, you’ll give the project a name and add a description, then hit print.
How to Print It:
- You should get a popup that asks if you want to open Sawgrass Print Utility. You will need to click Open Sawgrass Print Utility. If you are not seeing this, you’ll need to disable your popup blocker.
- In the Sawgrass Print Utility, start by scrolling down and changing your print orientation to Portrait.
- For this project, you can use the preset canvas tote bag.
- Make sure that the media size and type match what you have in the printer. On the Color Management Tab, we suggest having the Color Mode set to Vibrant.
- When you’ve confirmed all of your settings, Hit Print.
How to Press It:
- Use a lint free cloth to remove any dust or fibers before pressing.
- Place your design facing up and then place the pillow on it and tape the two together with heat resistant tape.
- Place the pillow on the lower platen of the press with the printer page on top.
- Place a piece of blowout paper on top.
- Close the press and wait 45 seconds before opening the press and removed the printed pillowcase.
Tips & Tricks:
- If the design is not full bleed, make sure to keep the pillow zipper outside of the press so it isn’t damaged. If it needs to be in the press, a pressing pillow inside the case will help prevent damage.
- This is a great example of modifying a design to use with a large item like a pillow.
- Modifying a design allows you to print on pillows or tote bags even if you have an SG500.
Three Tips for the 20oz Skinny Tumbler + CraftPro Mug & Tumbler Heat Press
For full bleed past the edge, apply tape with tension around the top and bottom of the tumbler.
Getting that picture-perfect, edge-to-edge design on your skinny tumbler is all about the details. Applying tape with tension around the top and bottom ensures your design goes beyond the edges, creating a seamless and professional look.
Adjust the pressure before powering on the heat press. This helps avoid burns or heating up the product unnecessarily.
Start with the right pressure. Before you power on the heat press, make sure to adjust the pressure settings. This not only helps in preventing burns but also ensures efficient and effective heat distribution, giving you optimal results every time.
Be sure to wear protective gloves. This makes rotating the hot tumbler easier and safer.
Safety first! Wearing protective gloves isn’t just a precaution; it’s a necessity. It not only protects your hands but also makes rotating the hot tumbler a breeze. Safety and convenience go hand in hand.
Three Tips for a 7.5” Round Mouse Pad + CraftPro 12”x15” Swing Away Heat Press
Use your print bleed to center your mouse pad with the transfer and heat tape it in place.
Achieving a centered design is crucial for a professional-looking mouse pad. Utilize your print bleed to center the design and secure it in place with heat tape. This ensures that your image is perfectly positioned for a flawless result.
For even pressure, you always want to center your substrate on the lower platen.
Consistency is key. Center your mouse pad or any flat item on the lower platen to ensure even pressure. This simple step can make a significant difference in the quality of your sublimation prints.
Place a sheet of parchment paper on both top and bottom when sublimating flat items. This keeps any sublimation dye off the press and even future projects.
Protect your press and future projects by placing a sheet of parchment paper on both the top and bottom when sublimating flat items. This prevents any sublimation dye from transferring to the press and ensures clean, worry-free printing.
Three Tips for Sublimation Success
When pressing multiple items, add a few seconds for each additional piece.
Efficiency matters. If you’re working on multiple items, adjust your pressing time by adding a few seconds for each additional piece. This ensures that every item gets the attention it deserves for vibrant and lasting results.
You don’t need heavy pressure for sublimation. Medium-light works in most situations.
Gone are the days of thinking that heavier pressure equals better results. In most cases, medium-light pressure is sufficient for successful sublimation. Experiment and find the sweet spot for your specific projects.
Use pressing pillows to help minimize the appearance of press marks on your garments.
Pressing pillows are your best friend when it comes to minimizing press marks on garments. They provide even pressure and support, resulting in a professional finish without unwanted marks.
Plus Two Bonus Tips
Are your mugs ghosting? Wait a few extra minutes for your print to set before peeling.
Patience is key when it comes to avoiding ghosting on your mugs. Wait a few extra minutes for your print to set before peeling. This simple step can make a big difference in the final appearance of your sublimated mugs.
Are your colors not coming out right? Use your blacks as a gauge for making adjustments.
Colors not quite right? Your blacks hold the secret. If your blacks are brown, it’s a sign of overcooking. Reduce your time and/or temperature. If your blacks are gray or cloudy, it’s undercooked. Increase your time and/or temperature for a color-perfect outcome.
In conclusion, these tips from Heat Press Nation are a game-changer for anyone diving into sublimation. Incorporate these suggestions into your workflow, and watch your sublimation projects reach new heights of success. Happy sublimating!
Color choice within the realm of product design is an art. It’s not just about aesthetic appeal, it’s about evoking the right emotion, setting the mood, and often, making a bold statement. For crafters, each color is a thread in the fabric of their creation, setting the tone and telling a story.
The right palette can turn a simple sublimation design into a whimsical treasure, or a custom creation into a memorable centerpiece. Color is the silent salesperson and the visual language communicating the essence and personality of the product. It’s your ticket to creating pieces that are not just visually delightful, but products and designs that resonate on a deeper level with your audience.
Let’s not forget, a well chosen color palette can be the difference between a product that blends into a marketplace, and one that’s snapped up faster than free samples at Costco!
What is Color Psychology?
Within sublimation printing, every hue printed onto a product is more than a mere aesthetic choice, it’s an interaction between the design and the observer’s psyche. Color psychology, the study of how colors influence human thoughts, emotions, and behaviors, plays a pivotal role in this interaction.
Colors aren’t just aesthetic, they communicate, evoke feelings, and even drive actions. Whether it’s a vibrant red that stirs excitement or a cool blue that soothes, understanding color psychology is crucial for creating sublimation products that resonate with the audience¹. As a sublimation pro, hobbyist or crafter, harnessing the power of color psychology in your designs is not just an art, it’s a science that can significantly impact the appeal and success of your products and designs.
Color Theory 101
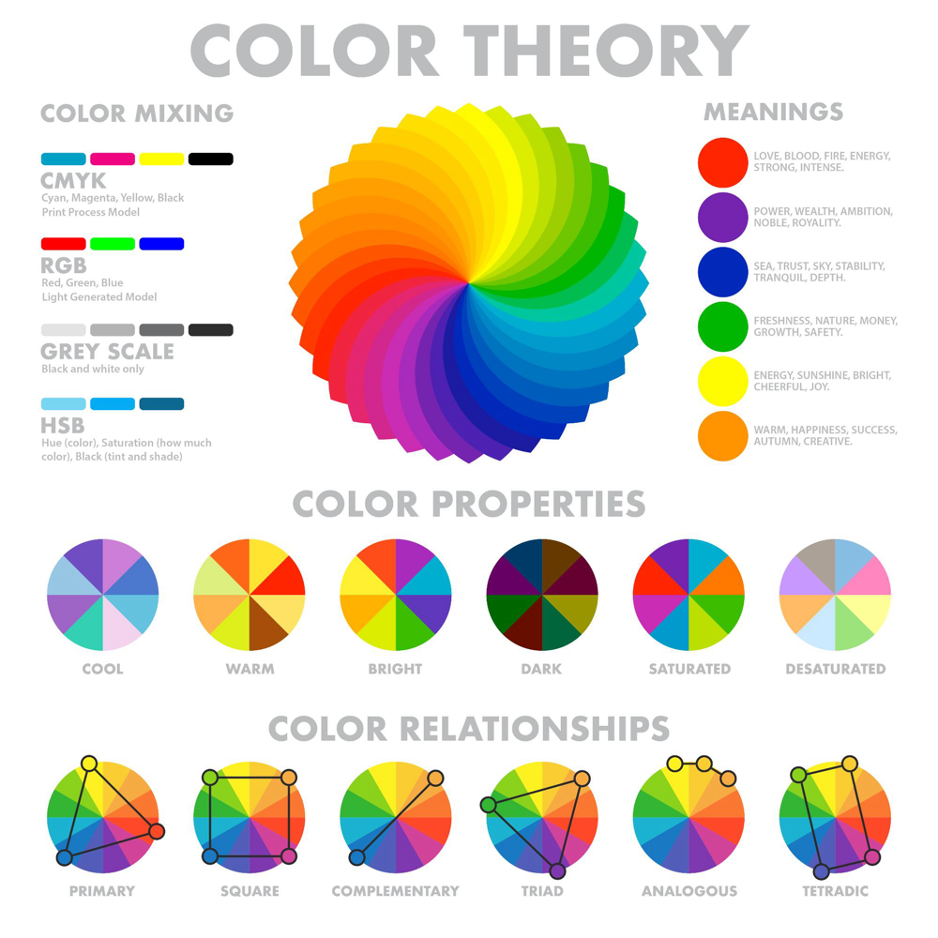
Color Basics
At the heart of the color wheel, reside the three primary colors: red, yellow, and blue. These fundamental hues cannot be created by mixing other colors. They stand as the foundation from which all other colors emerge.
From the union of primary colors, secondary colors are born. Orange, the child of red and yellow, bursts forth with warmth and energy. Green, the offspring of blue and yellow, exudes tranquility and harmony. And violet, the progeny of red and blue, radiates mystery and sophistication.
The color wheel’s story doesn’t end there. Tertiary colors, the grandchildren of the primary hues, emerge from the blending of a primary color with its neighboring secondary color. Red-orange, yellow-orange, yellow-green, blue-green, blue-violet, and red-violet. These six hues add depth and nuance to the color spectrum.
Understanding the relationships between primary, secondary, and tertiary colors is the key to unlocking the secrets of a magical palette. With this knowledge, you can create harmonious color schemes, evoke specific moods, and bring your artistic visions to life.
Harmony and Contrast
In the grand symphony of color, harmony and contrast play a captivating duet. While harmony is typically an arrangement of colors that soothes the eye, contrast introduces a dynamic tension that captures attention. Together, they orchestrate a visual dance that captivates the senses.
Color harmony is comprised of analogous colors, complementary colors and triadic colors. Analogous colors, neighbors on the color wheel, create a sense of serenity and flow. Complementary colors, positioned opposite each other, provide a vibrant contrast that electrifies the senses. And triadic colors, three evenly spaced hues, offer a balanced and vibrant composition.
Color contrast on the other hand, introduces a bold counterpoint to harmony’s gentle melody. It’s the sharp drumbeat that adds excitement and energy to the visual composition. High contrast, like a bold exclamation, uses starkly different colors to create a striking visual impact. Low contrast, like a subtle whisper, employs closely related hues for a more subdued effect.
The art of combining color harmony and contrast lies in understanding their interplay. A harmonious palette can be spruced up with a touch of contrast, while a high-contrast scheme can be tempered with harmonious elements. It’s a delicate balance, a dance between visual tranquility and excitement.
By mastering the concepts of color harmony and contrast, you can become a composer of visual experiences. You can evoke moods, guide attention, and create compositions that resonate with our audience.
Concept to Creation
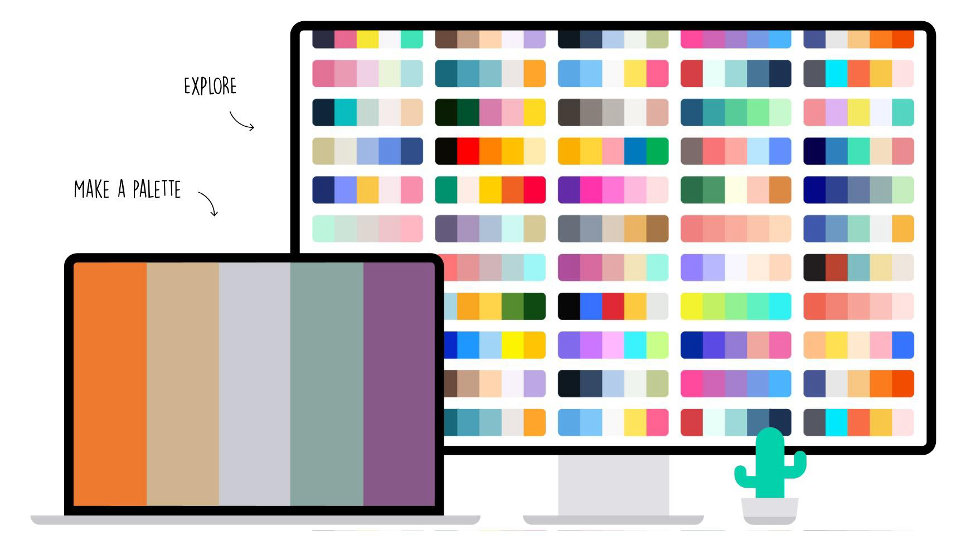
Now it’s time to take these concepts and turn your passion to profit. With the innovative MySawgrass design tool, you have the power to transform your products into works of art by harnessing a vast collection of professional designs. DesignMate also allows users to create custom branded pallets.
Creating a custom brand palette in the design tool is crucial for creators looking to open a store in MySawgrass or anyone aiming to maintain brand consistency across all their visual content. By integrating a custom brand palette, you can ensure that your brand colors are accurately and consistently represented in each design. Having a custom brand palette readily available, streamlines the design process, saving time and effort in selecting and applying brand-specific colors to the thousands of designs within the MySawgrass design tool.
This versatile tool allows you to seamlessly integrate these designs with your products while retaining the flexibility to make them uniquely your own. Whether it’s altering text, experimenting with colors psychology, or entirely reworking the design, customization knows no bounds. To fully utilize color psychology and connect with your audience, use every tool at your disposal.
Consider tapping into color pallet tools like colors.co or colorhunt.co to effortlessly generate custom color palettes. Eliminate the guesswork and dive into the realm of color psychology. Using pallet generators not only enables personalization based on your intent but also ensures that the final product resonates with your target audience on a profound emotional level, making each creation a masterpiece that’s as individual as the crafter behind it.
Tips to Consider
- Understand Your Audience and Have Intention: Begin by understanding the demographic and preferences of your target audience. Different colors can evoke varying emotions and responses in different groups, so tailoring your color choices to your audience is key. To get a deeper understanding of how specific colors can provoke different responses, check out colorpsychology.org. Use intention with your color selections to make sure to get the response you are looking for.
- Keep it Consistent: Maintain a consistent color scheme across all elements of your product design, from packaging to advertising. Consistency builds brand recognition and reinforces the emotional associations tied to your brand’s colors. Using an array of colors in your designs is great, although adhering to a brand aesthetic will help with your product recognition. Consider sticking to your brand palette within DesignMate for the majority of your designs.
- Don’t Forget Balance and Contrast: Create visual interest by balancing and contrasting colors strategically. A harmonious blend of complementary colors can make a product visually appealing, while contrast can draw attention to specific elements. Use these tools when creating products that you want to pop or adhere to a season or theme.
- Consider Cultural Significance: Be mindful of the cultural connotations of colors. Colors can have different meanings in different cultures, so research and adapt your color choices to avoid unintended misinterpretations.
- Test and Iterate: Don’t hesitate to test different color combinations and designs. Conduct research, create multiple iterations of your designs and gather feedback from friends and family to ensure your color choices align with the desired emotional response as well as your brand identity.
By applying these tips, you can harness the power of color psychology to create products that not only look visually appealing but also resonate with your audience on a deeper level.
Print Vibrant Prints Every Time
We know color psychology can be hard and printing consistently can be even harder, that’s where the Sawgrass Print Utility comes in handy. The Sawgrass Print Utility stands out as an exceptional tool for consistently producing vibrant prints, thanks to its advanced features that simplifies and guarantees exceptional results in every sublimation project.
The print utility features a user-friendly and customizable interface, making it accessible for both novices and experienced users alike. The customization options are extensive, allowing users to save custom paper sizes and use multiple color profiles for optimal output on various surfaces like ceramic, wood, and textile.
The Swgrass Print Utility is compatible with popular software like Adobe and Corel, along with support for a wide range of graphic file formats. The Sawgrass Print Utility’s advanced color management tools, including custom colors, spot colors, palettes, and color sliders, ensure precise color matching and reproduction. The print utility takes years of sublimation experience and allows you to focus on what matters, making professional and vibrant products with ease and efficiency.
Time to Stand Out
In the colorful world of sublimation design, understanding the nuances of color psychology is your key to unlocking success. From evoking the right emotions to enhancing brand recognition, the strategic use of colors can make your designs truly stand out. So, as you embark on your creative journey, remember that the spectrum of success lies in your hands, and the possibilities are as endless as the colors in your palette. To get started, create your MySawgrass account, browse the thousands of professional designs, make them your own and turn your passion to profit.
Tip 1: Before pressing, clean your drinkware
Before attaching your print to your blank, make sure to clean it to remove any fingerprints or particles that may be on the surface. Either can leave smudges or specks on your finished product. For hard surfaces like tumblers or mugs, we recommend using denatured alcohol and a lint free cloth. Can’t find denatured alcohol? Use isopropyl alcohol that is at least 90%.
Tip 2: Tape your print to your blank well
Use heat resistant tape to attach your print to your blank. It’s important to tape it tightly and to not only tape the ends, but the top and bottom as well. It is important that the paper is very tightly secured to the blank. When the heat is applied, if the paper is too loose, the ink gas may not go straight into the blank and may instead escape. Gassing as it often called, will result in streaks of blurred color across your image.
Tip 3: Remove the transfer right after removing the tumbler from the press
For some stainless steel tumblers, leaving the paper on the tumbler for too long after pressing will cause it to stick. The best thing to do is remove it as quickly as possible to keep this from happening. If you are using shrink wrap on your drink ware and placing it in a convection oven, remove the shrink wrap and transfer as soon as you remove the tumbler from the press. The longer the shrink wrap stays on the drink ware, the harder it is to remove.
Tip 4: If the paper does stick, remove it with soap and water
If the paper does stick to your tumbler, don’t panic. Soap and water will remove any paper that may remain. Because sublimation becomes a part of the coating, removing something stuck to the surface will not damage the design. In addition to removing the transfer paper shortly after pressing, other things you can do to prevent this from happening again is to reduce the pressure and the time. If the pressure is too high, it can cause the paper to stick. This happens with time as well. Try dropping your time in intervals of 5 seconds to see if this eliminates the issue.
Tip 5: Make sure you are using the right press for the right product
There are three main types of presses that can be used for drink ware: mug presses, tumbler presses, and convection ovens. It’s important to know which press is best for your project.
Mug presses are designed specifically for 11oz and 15oz ceramic mugs. This type of press is a very cost effective solution for these products. There are work arounds for other products, but it is best for ceramic mugs. You can also press enamel camp style mugs in a mug press. You’ll need to add a silicone pad which will make the width even with the lip of the cup. Then, you’ll put the mug in the press upside down.
A tumbler press the is adjustable is great for stainless steel tumblers. This will also you to match the pressure to a variety of sizes of tumblers. Ceramic mugs will work well in a tumbler press as well, so this is a great option for the widest variety of drink ware.
If you are pressing drink ware that is curved or tapered, a sublimation oven is a great options. For these convention ovens, you’ll tape the design in place and then use shrink wrap to hold it tightly in place.
Tip 6: For designs that fully wrap around the tumbler, rotate halfway through pressing
Skinny tumblers with a design that wraps completely around the tumbler are very trendy products. To get a design to fully wrap around the tumbler, set your tumbler press for the full time suggested by your dealer. At the halfway point, open the press and rotate the tumbler at least 45 degrees. Close the press back and let it run for the remaining time. To eliminate needing to rotate, you can sublimate these items in a Sublimation Convention Oven by using shrink wrap.
Tip 7: If your colors are off, adjust your temperature
If your colors are off after pressing, observing how they are off may give you the answer to correcting the issue. In general, blacks that look to be greenish are generally under cooked. Up your press temperature in increments of 5 degrees. If your blacks are tending to be a bit brown, the design is getting too much heat. Reduce your temperature in increments of 5 degrees. Another great early step to take is to print a nozzle check from your printer. You can do this from the devices page under settings in PrintMate or from the LCD panel on the printer. If you are seeing any breaks, which are missing boxes, on the nozzle check, you have clogged nozzles that are probably causing your color issues and you can troubleshoot from there. If your nozzles are fine, start looking at your process, specifically your time, temperature, and pressure.
Tip 8: Check your Dealer site for pressing instructions
The best place to start with any sublimation project is on your Dealer’s website. Dealers will often include pressing instructions, as well as tips and tricks, on the product listing page. These are a huge help to make sure you are getting the best results when pressing your products. While we can provide general guidelines for pressing certain blanks, the information on your Dealer’s page is specific to their product.
Tip 9: Make sure your paper is lined up to get the best result
When you are attaching your print to your blank, make sure the it lines up so that your design is not skewed on the final product. One easy way to do this is have an edge that is uncut, which will make it easiest to line up one end with the other. When you do have to cut the paper, make sure that you are using rulers to keep your edges as even as possible. Using an additional light source, like a light box, is a good way to see exactly how your design in lined up on your product before pressing.

Tip 10: Remove any accessories before putting your tumbler in the press
Tumblers often come with removable pieces like straws, lids, and sometimes handles. These need to be removed before pressing. For one, they could impact you getting an even and consistent press. Also, these items are often made of plastic and can melt or warp in the press.
There you have it; our top tips for helping you get the best result when pressing tumblers. Join the MySawgrass community for more tips from our sublimation community!