
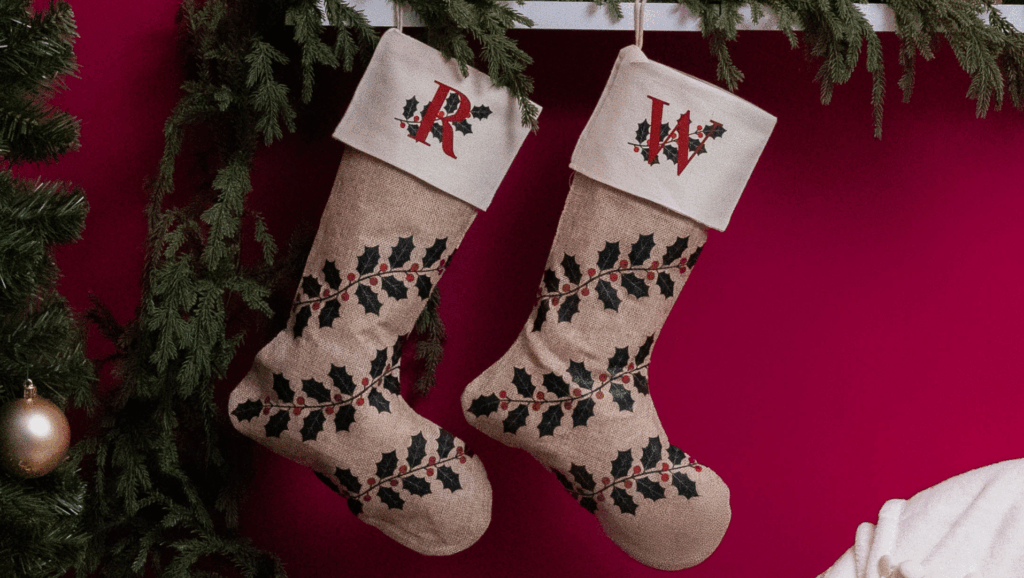
Featuring cheerful holiday designs and a personalized monogram, this project is the perfect blend of classic and custom. Made with Sawgrass VersiFlex, it’s easy to add bright, durable details that make your mantel merry and bright.
Skill Level: Advanced
Tools & Supplies:
- MySawgrass+ Subscription
- SG1000
- VersiFlex Inks
- VersiFlex Light Paper
- Flat Press
- Burlap or Fabric Stocking
- Blowout Paper
How To Create It:
For The Cuff:
- Click the DESIGN button on your MySawgrass dashboard.
- Select Custom Canvas: Rectangle 2.75” x 2”
- Select Your Design: Holly_Jolly_Initial
- Size to fit canvas, personalize with your desired initial.
- Send your ready to design to print utility by clicking PRINT.
For The Foot:
- Click the DESIGN button on your MySawgrass dashboard.
- Select Custom Canvas: Rectangle 10.75” x 10.5”
- Select Your Design: Holly_Jolly_Laurel_Stack
- Size to fit canvas.
- Send your ready to design to print utility by clicking PRINT.
How To Print It:
For The Cuff:
- Select your ready printer loaded with Sawgrass VersiFlex inks.
- Select the Burlap preset, or select Natural Fabrics (Burlap, Canvas Linen) as the product.
- Load paper with VersiFlex Light paper.
- Click Print.
For The Foot:
- Select your ready printer loaded with Sawgrass VersiFlex inks.
- Select the Burlap preset, or select Natural Fabrics (Burlap, Canvas Linen) as the product.
- Load printer with VersiFlex Light paper.
- Click Print.
How To Press It:
- Temperature: 375°F
- Temperature: 30 seconds
- Pressure: High
For The Cuff:
- Position the top of your stocking onto the base of your heat press.
- Prepress your fabric for 10-15 seconds to release moisture. If you see steam when releasing the press, press again until the steam disappears.
- While the print is still wet, place your print face down onto the center of the cuff. Do not reposition your print once you have it placed.
- Place a piece of protective blowout paper over your print to protect your heat press from any excess ink.
- Press for 30 seconds at 375°F at high pressure.
- When the timer sounds, open your press and peel your print immediately. Delayed peeling will cause the paper to stick.
- Place the blowout paper back over the printed fabric and press for another 10 seconds to seal the print.
For The Foot:
- Position the sock of your stocking onto the base of your heat press.
- Prepress your fabric for 10-15 seconds to release moisture. If you see steam when releasing the press, press again until the steam disappears.
- While the print is still wet, place your print face down onto the foot with the corners of the middle holly laurel angled to touch the inside curve and outside heel of the foot. Do not reposition your print once you have it placed.
- Place a piece of protective blowout paper over your print to protect your heat press from any excess ink.
- Press for 30 seconds at 375° at high pressure.
- When the timer sounds, open your press and peel your print immediately. Delayed peeling will cause the paper to stick.
- Place the blowout paper back over the printed fabric and press for another 10 seconds to seal the print.
Tips & Tricks:
- For a quick and easy project, or to personalize using a SG500, simply print and press the stocking cuff.
- If your stocking has a lining that is not heat resistant, stuff your stocking with heat-resistant padding or paper to prevent it from sticking together once pressed.


